

Irish Terrier Ear Training
| The vast majority of Irish Terrier puppies must have their ears trained in order to attain proper ear carriage. The ear is carried in many positions when the dog is at ease. Ear training is designed to affix the position of the ear when the dog is alert and carrying his ears up. It is difficult to recommend a single method for training ears because of the variety of ear sizes, the varying amount of cartilage which different ears contain, and the unique location upon the skull each pair of ears maintains. Because of these varying factors and differences in human perception, no two Irish Terrier breeders train ears in identical fashion. Several tips and suggestions from a variety of breeders are compiled herein to serve as a guide to the training of ears. As different as each breeder’s methods are, each of them are linked by one common theme: persistence.Between six and twelve weeks of age most Irish Terrier puppies begin to pull their ears up into position. The first sign is a small ridge beginning to rise a short distance away form where the ear is joined to the top of the head, Some ears immediately pop up and into position. Others lift partially and a few do not lift at all. Regardless of the pup’s ear carriage as a result of lifting the ears at the early age of six to twelve weeks, the carriage will probably be altered as the puppy begins to cut adult teeth. The teething process onsets at four and one-half months and continues until nearly eight months of age.The majority of breeders begin setting ears during the six to twelve week period and continue setting them through the bulk of the teething period. The ears are trained primarily by gluing them to the skull. The preferred glues are duo-surgical adhesives, fabric menders, and special canine ear-setting glues. In most instances the glue is applied to the underside of the ear and the ear is pressed onto the skull or folded against itself.The overall goal of training ears is to create a good carriage. This may be broken down into two sub-goals: helping the ear lift, and helping the ear fold tightly so that the tip will touch the head. During the teething process, the calcium needed to set the lift and fold in the ear cartilage is shunted away to teeth and bones. The lack of consistent amounts of calcium during this critical period of development causes the ears to stand or drop improperly. |
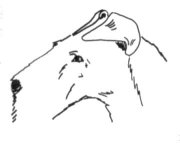 To assist the lift at the point where the top of the ear joins the skull many breeders set the ear high on the skull towards the middle of the head. Sometimes this technique flattens the bell of the ear, causing the outer portion of the ear to stand out or, in several cases, to curl back over itself into a rosed-ear. To assist the lift at the point where the top of the ear joins the skull many breeders set the ear high on the skull towards the middle of the head. Sometimes this technique flattens the bell of the ear, causing the outer portion of the ear to stand out or, in several cases, to curl back over itself into a rosed-ear.In Diagram 1: Ears set high on the skull create lift. |
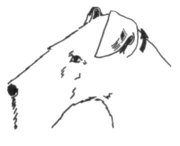 To correct this tendency and create a tight fold which brings the tip of the ear down against the head the ear is often reset with the tip glued very close to the base of the ear. These methods are often used alternately. To correct this tendency and create a tight fold which brings the tip of the ear down against the head the ear is often reset with the tip glued very close to the base of the ear. These methods are often used alternately.In Diagram 2: The tips glued close to the base creates a crease across the ear and gives proper convex curvature to the bell. |
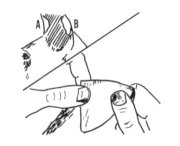 Some breeders prefer to apply glue to he inside of the top fold and the inside of the bell. These areas are then pressed together to create a sharp fold at the top of th ear and give proper shape to the bell. Glue is then applied to the exterior of the top fold and to the inner top edge of the ear. The fold is glued to the back of the skull and the top edge to the skull behind the brow. Some breeders prefer to apply glue to he inside of the top fold and the inside of the bell. These areas are then pressed together to create a sharp fold at the top of th ear and give proper shape to the bell. Glue is then applied to the exterior of the top fold and to the inner top edge of the ear. The fold is glued to the back of the skull and the top edge to the skull behind the brow.In Diagram 3: Place glue on inside top fold (A) and inside bell (B), then press together. |
| When gluing and setting the ear always leave some open space to allow air to ventilate the ear canal. If strips of tape are used to secure the ear while the glue dries then remove the tape immediately after the glue is dry. A coating of the ear and skull area with Tincture of Benzoine or Tincture of Benzoine with Aloe (available via your pharmacist) is often used prior to applying the glue. This will help to prevent sores and reactions to the gluing. It will also help the glue to adhere. In Diagram 4: Glue the exterior of the top fold to the back of the 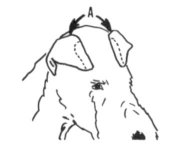 head (A), and the top edge of the ear to the skull behind the brow. head (A), and the top edge of the ear to the skull behind the brow. |
| During the ear setting process, smell your dog’s ears on a daily basis. If there is an unusual smell or ‘off’ odor, take the ears down immediately, using oil or Spray and Wash as described below. Clean out the inner ears. Let them air out for at least twenty-four hours, making sure that they are not infected before setting them again.
Most good ear sets will stay in position for seven to ten days. When the ears come unfastened clean them, allow them to air out for twenty-four hours and then reset them. Do not pull or rip the ear lose from the skull or pull or rip the glue off of the ear. Any oil, such as baby oil, olive oil, cold cream, or cooking oil, will soften the glue to help with removal. A flea comb can be used to further assist the removal of the glue once it is softened. Alternatives to glue removal with oil are: Spray and Wash (soak the glue for five to ten minutes then comb out) or Albolene Liquifying Cleanser (available at your drugstore).Keep setting the ears until you are certain they no longer show signs of rising off the skull or slumping down the cheek. Ear training lasts for a relatively short period of time in the dog’s life, three to six months out of a lifetime of twelve to fifteen or more years. If necessary the ears can be set until several months after the dog has attained his full growth. For bitches, the onset of the first season will often require that the ears be set again. Setting the ears in the correct locations and doing so consistently are the keys to successful ear training. |
From: www.irishterrers.com
